Redis 介面
運作方式
Redis 介面依賴於 Redis Pub/Sub 機制。
傳送至多個用戶端的每個封包(例如 io.to("room1").emit() 或 socket.broadcast.emit())會
- 傳送至連線至目前伺服器的所有符合用戶端
- 在 Redis 頻道中發布,並由叢集中的其他 Socket.IO 伺服器接收

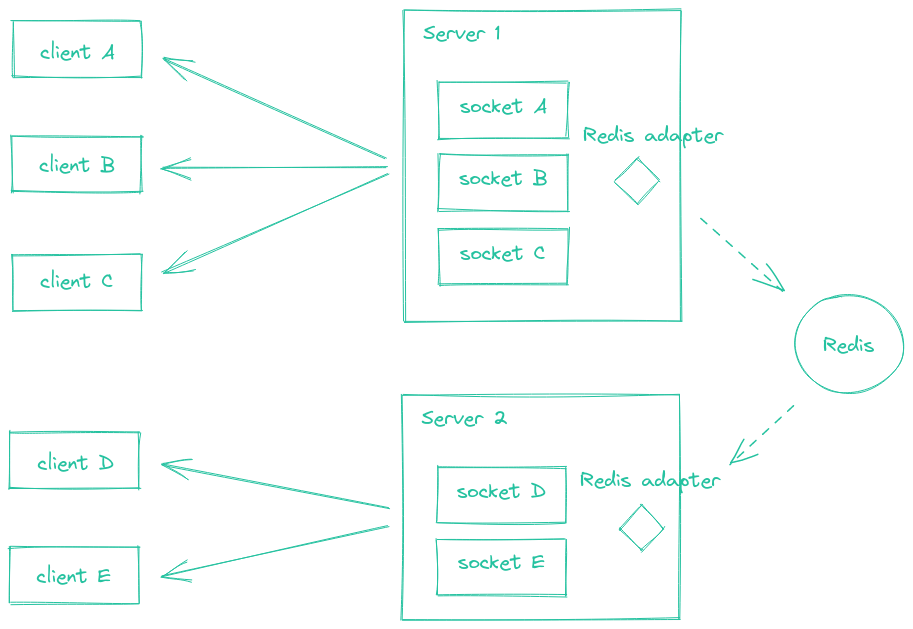
此介面的原始碼可在此處找到 連結。
支援的功能
| 功能 | socket.io 版本 | 支援 |
|---|---|---|
| Socket 管理 | 4.0.0 | ✅ 是的(自版本 6.1.0 起) |
| 伺服器間通訊 | 4.1.0 | ✅ 是的(自版本 7.0.0 起) |
| 具有確認的廣播 | 4.5.0 | ✅ 是的(自版本 7.2.0 起) |
| 連線狀態復原 | 4.6.0 | ❌ 否 |
安裝
npm install @socket.io/redis-adapter
相容性表格
| Redis 介面卡版本 | Socket.IO 伺服器版本 |
|---|---|
| 4.x | 1.x |
| 5.x | 2.x |
| 6.0.x | 3.x |
| 6.1.x | 4.x |
| 7.x 以上 | 4.3.1 以上 |
使用
使用 redis 套件
redis 套件似乎在重新連線後有問題恢復 Redis 訂閱
您可能需要改用 ioredis 套件。
import { createClient } from "redis";
import { Server } from "socket.io";
import { createAdapter } from "@socket.io/redis-adapter";

const pubClient = createClient({ url: "redis://#:6379" });
const subClient = pubClient.duplicate();

await Promise.all([
  pubClient.connect(),
  subClient.connect()
]);

const io = new Server({
  adapter: createAdapter(pubClient, subClient)
});

io.listen(3000);
使用 redis 套件和 Redis 群集
import { createCluster } from "redis";
import { Server } from "socket.io";
import { createAdapter } from "@socket.io/redis-adapter";

const pubClient = createCluster({
  rootNodes: [
    {
      url: "redis://#:7000",
    },
    {
      url: "redis://#:7001",
    },
    {
      url: "redis://#:7002",
    },
  ],
});
const subClient = pubClient.duplicate();

await Promise.all([
  pubClient.connect(),
  subClient.connect()
]);

const io = new Server({
  adapter: createAdapter(pubClient, subClient)
});

io.listen(3000);
使用 ioredis 套件
import { Redis } from "ioredis";
import { Server } from "socket.io";
import { createAdapter } from "@socket.io/redis-adapter";

const pubClient = new Redis();
const subClient = pubClient.duplicate();

const io = new Server({
  adapter: createAdapter(pubClient, subClient)
});

io.listen(3000);
使用 ioredis 套件和 Redis 群集
import { Cluster } from "ioredis";
import { Server } from "socket.io";
import { createAdapter } from "@socket.io/redis-adapter";

const pubClient = new Cluster([
  {
    host: "localhost",
    port: 7000,
  },
  {
    host: "localhost",
    port: 7001,
  },
  {
    host: "localhost",
    port: 7002,
  },
]);
const subClient = pubClient.duplicate();

const io = new Server({
  adapter: createAdapter(pubClient, subClient)
});

io.listen(3000);
使用 Redis 分片式 Pub/Sub
分片式 Pub/Sub 在 Redis 7.0 中引入,目的是幫助擴展群集模式中 Pub/Sub 的使用。
參考:https://redis.io/docs/interact/pubsub/#sharded-pubsub
可以使用 createShardedAdapter() 方法建立專用的介面卡
import { Server } from "socket.io";
import { createClient } from "redis";
import { createShardedAdapter } from "@socket.io/redis-adapter";

const pubClient = createClient({ host: "localhost", port: 6379 });
const subClient = pubClient.duplicate();

await Promise.all([
  pubClient.connect(),
  subClient.connect()
]);

const io = new Server({
  adapter: createShardedAdapter(pubClient, subClient)
});

io.listen(3000);
最低需求
- Redis 7.0
redis@4.6.0
目前無法使用分片式轉接器搭配 ioredis 套件和 Redis 群集(參考)。
選項
預設轉接器
| 名稱 | 說明 | 預設值 |
|---|---|---|
key | Redis Pub/Sub 通道的字首。 | socket.io |
requestsTimeout | 經過這段逾時時間後,轉接器將停止等待要求回應。 | 5_000 |
publishOnSpecificResponseChannel | 是否將回應發布到特定於要求節點的通道。 | false |
parser | 用於編碼和解碼傳送至 Redis 的訊息的剖析器。 | - |
將 publishOnSpecificResponseChannel 選項設定為 true 較為有效率,因為回應(例如呼叫 fetchSockets() 或 serverSideEmit() 時)只會傳送給要求的伺服器,而不是所有伺服器。
不過,目前預設為 false 以維持向後相容性。
分片式轉接器
| 名稱 | 說明 | 預設值 |
|---|---|---|
channelPrefix | Redis Pub/Sub 通道的字首。 | socket.io |
subscriptionMode | 訂閱模式會影響轉接器使用的 Redis Pub/Sub 通道數量。 | dynamic |
常見問題
Redis 中是否儲存任何資料?
沒有,Redis 轉接器使用 Pub/Sub 機制 在 Socket.IO 伺服器之間轉發封包,因此 Redis 中沒有儲存任何金鑰。
使用 Redis 適配器時,我是否仍需要啟用黏著式工作階段?
是。未執行此動作將導致 HTTP 400 回應(您正在連線到不認識 Socket.IO 工作階段的伺服器)。
更多資訊可在此處找到 here。
當 Redis 伺服器當機時會發生什麼事?
如果與 Redis 伺服器的連線中斷,封包將只會傳送給連線至目前伺服器的客戶端。
從 socket.io-redis 遷移
套件已從 socket.io-redis 重新命名為 @socket.io/redis-adapter,以符合 Redis 發射器 (@socket.io/redis-emitter) 的名稱。
若要遷移至新的套件,您需要提供自己的 Redis 客戶端,因為套件將不再代表使用者建立 Redis 客戶端。
之前
const redisAdapter = require("socket.io-redis");

io.adapter(redisAdapter({ host: "localhost", port: 6379 }));
之後
const { createClient } = require("redis");
const { createAdapter } = require("@socket.io/redis-adapter");

const pubClient = createClient({ url: "redis://#:6379" });
const subClient = pubClient.duplicate();

io.adapter(createAdapter(pubClient, subClient));
Socket.IO 伺服器之間的通訊協定尚未更新,因此您可以在同一時間使用 socket.io-redis 的伺服器和使用 @socket.io/redis-adapter 的伺服器。
最新版本
| 版本 | 發佈日期 | 發佈說明 | 差異 |
|---|---|---|---|
8.3.0 | 2024 年 3 月 | 連結 | 8.2.1...8.3.0 |
8.2.1 | 2023 年 5 月 | 連結 | 8.2.0...8.2.1 |
8.2.0 | 2023 年 5 月 | 連結 | 8.1.0...8.2.0 |
8.1.0 | 2023 年 2 月 | 連結 | 8.0.0...8.1.0 |
8.0.0 | 2022 年 12 月 | 連結 | 7.2.0...8.0.0 |
7.2.0 | 2022 年 5 月 | 連結 | 7.1.0...7.2.0 |
發射器
Redis 發射器允許從另一個 Node.js 程序將封包傳送給連線的客戶端
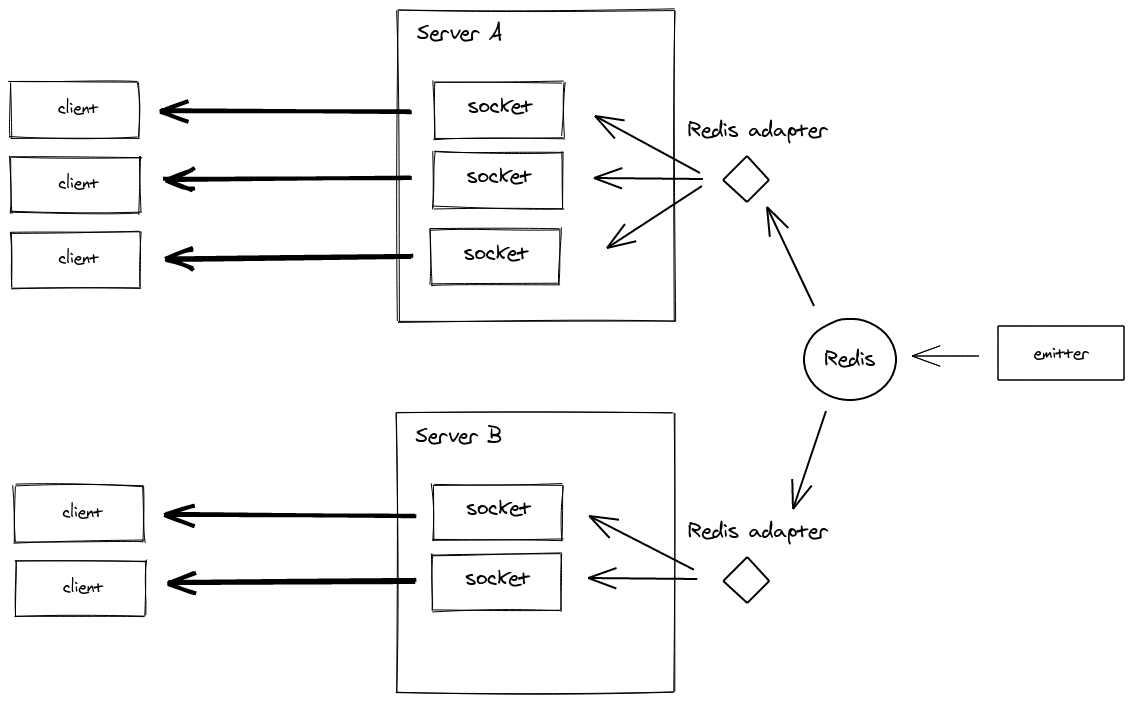

此發射器也提供多種語言
- Javascript:https://github.com/socketio/socket.io-redis-emitter
- Java: https://github.com/sunsus/socket.io-java-emitter
- Python: https://pypi.org/project/socket.io-emitter/
- PHP: https://github.com/rase-/socket.io-php-emitter
- Golang: https://github.com/yosuke-furukawa/socket.io-go-emitter
- Perl: https://metacpan.org/pod/SocketIO::Emitter
- Rust: https://github.com/epli2/socketio-rust-emitter
安裝
npm install @socket.io/redis-emitter redis
用法
import { Emitter } from "@socket.io/redis-emitter";
import { createClient } from "redis";

const redisClient = createClient({ url: "redis://#:6379" });

redisClient.connect().then(() => {
  const emitter = new Emitter(redisClient);

  setInterval(() => {
    emitter.emit("time", new Date);
  }, 5000);
});
注意:使用 redis@3 時,不需要在 Redis 伺服器上呼叫 connect()
import { Emitter } from "@socket.io/redis-emitter";
import { createClient } from "redis";

const redisClient = createClient({ url: "redis://#:6379" });
const emitter = new Emitter(redisClient);

setInterval(() => {
  emitter.emit("time", new Date);
}, 5000);
請參閱此處的秘笈 here。
從 socket.io-emitter 遷移
此套件已在 v4 中從 socket.io-emitter 重新命名為 @socket.io/redis-emitter,以更清楚地反映與 Redis 的關係。
若要遷移至新的套件,您需要提供自己的 Redis 客戶端,因為套件將不再代表使用者建立 Redis 客戶端。
之前
const io = require("socket.io-emitter")({ host: "127.0.0.1", port: 6379 });
之後
const { Emitter } = require("@socket.io/redis-emitter");
const { createClient } = require("redis");

const redisClient = createClient();
const io = new Emitter(redisClient);
最新版本
| 版本 | 發佈日期 | 發佈說明 | 差異 |
|---|---|---|---|
5.1.0 | 2023 年 1 月 | 連結 | 5.0.0...5.1.0 |
5.0.0 | 2022 年 9 月 | 連結 | 4.1.1...5.0.0 |
4.1.1 | 2022 年 1 月 | 連結 | 4.1.0...4.1.1 |
4.1.0 | 2021 年 5 月 | 連結 | 4.0.0...4.1.0 |
4.0.0 | 2021 年 3 月 | 連結 | 3.2.0...4.0.0 |